Automatically shrink your VM disk images when you delete files

Update: This got significantly simpler with newer qemu and virt-manager, read an updated post.

If you use VMs a lot, you know that with the most popular qcow2 disk format, the disk image starts small, but grows with every filesystem change happening inside the VM. Deleting files inside the VM doesn’t shrink it. Of course that wastes a lot of disk space on your host – the VMs often contain gigabytes of freed space inside the VM, but not on the host. Shrinking the VM images is possible, but tedious and slow. Well, recently I learned that’s actually not true anymore. You can use the TRIM command, used to signalize to SSD drives that some space can be freed, to do the same in virtualization stack – signalize from VM to host that some space can be freed, and the disk image shrunk. How to do that? As usual, this is a shameless copy of instructions found elsewhere on the Internets. The instructions assume you’re using virt-manager or libvirt directly.

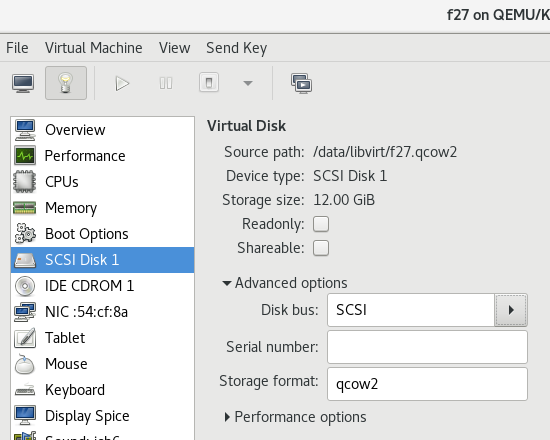
First, you need to using qcow2 images, not raw images (you can configure this when adding new disks to your VM).

Second, you need to set your disk bus to SCSI (not VirtIO, which is the default).

disk-scsi

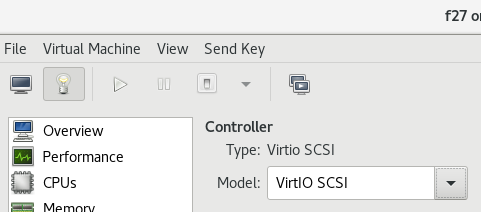
Third, you need to set your SCSI Controller to VirtIO SCSI (not hypervisor default).

controller-scsi

Fourth, you need to edit your VM configuration file using virsh edit vmname and adjust your hard drive’s driver line to include discard='unmap', e.g. like this:

<disk type='file' device='disk'>
 <driver name='qemu' type='qcow2' discard='unmap'/>

And that’s it. Now you boot your VM and try to issue:

$ sudo fstrim -av
/boot: 319.8 MiB (335329280 bytes) trimmed
/: 101.5 GiB (108928946176 bytes) trimmed

You should see some output printed, even if it’s just 0 bytes trimmed, and not an error.

If you’re using LVM, you’ll also need to edit /etc/lvm/lvm.conf and set:

issue_discards = 1

Then it should work, after a reboot.

Now, if you want trimming to occur automatically in your VM, you have two options (I usually do both):

Enable the fstrim timer that trims the system once a week by default:

$ sudo systemctl enable fstrim.timer

And configure the root filesystem (and any other one you’re interested in) to issue discard command automatically after each file is deleted. Edit /etc/fstab and add a discard mount option, like this:

UUID=6d368798-f4c2-44f9-8334-6be3c64cc449 / ext4 defaults,discard 1 1

And that’s it. Try to create a big file using dd, watch your VM image grow. Then delete the file, watch the image shrink. Awesome. If only we had this by default.

SSH to your VMs without knowing their IP address

This is a shameless copy of this blog post, but I felt like I need to put it here as well, so that I can find it the next time I need it 🙂

libvirt approach

When you run a lot of VMs, especially for testing, every time with a fresh operating system, connecting to them is a pain, because you always need to figure out their IP address first. Turns out that is no longer true. I simply added this snippet to my ~/.ssh/config:

# https://penguindroppings.wordpress.com/2017/09/20/easy-ssh-into-libvirt-vms-and-lxd-containers/
# NOTE: doesn't work with uppercase VM names
Host *.vm
 CheckHostIP no
 Compression no
 UserKnownHostsFile /dev/null
 StrictHostKeyChecking no
 ProxyCommand nc $(virsh domifaddr $(echo %h | sed "s/\.vm//g") | awk -F'[ /]+' '{if (NR>2 && $5) print $5}') %p

and now I can simply execute ssh test.vm for a VM named test and I’m connected! A huge time saver. It doesn’t work with uppercase letters in VM names and I didn’t bother to try to fix that. Also, since I run VMs just for testing purposes, I disabled all ssh security checks (you should not do that for important machines).

avahi approach

There’s also a second approach I used for persistent VMs (those that survive for longer than a single install&reboot cycle). You can use Avahi to search for a hostname on the .local domain to find the IP address. Fedora has this enabled by default (if you have nss-mdns package installed, I believe, which should be by default). So, in the VM, set a custom hostname, for example f27:

$ sudo hostnamectl set-hostname f27
$ reboot

Now, you can run ssh f27.local and it should connect you to the VM automatically.

Taskotron: depcheck task replaced by rpmdeplint

If you are a Fedora packager, you might be interested to know that in Taskotron we replaced the depcheck task with rpmdeplint task. So if there are any dependency issues with the new update you submit to Bodhi, you’ll see that as dist.rpmdeplint failure (in the Automated Tests tab). The failure logs should look very similar to the depcheck ones (basically, the logs contain the errors dnf would spit out if it tried to install that package), so there should be no transitioning effort needed.

If you listen for depcheck results somehow, i.e. in FMN, make sure to update your rules to listen for dist.rpmdeplint instead. We have updated the default filters in FMN, so if you haven’t changed them, you should receive notifications for failures in rpmdeplint (and also upgradepath and abicheck) for submitted updates owned by you.

The reason for this switch is that we wanted to get rid of custom dependency checking (done directly on top of libsolv), and use an existing tool for that instead. That saves us time, we don’t need to study all the pitfalls of dependency resolution, and we benefit from someone else maintaining and developing the tool (that doesn’t mean we won’t send patches if needed). rpmdeplint offered exactly what we were looking for.

We will decommission depcheck task from Taskotron execution in the next few days, if there are no issues. Rpmdeplint results are already being published for all proposed updates.

If you have any questions, please ask in comments or reach us at #fedora-qa freenode irc channel or qa-devel (or test or devel) mailing list.

Welcome Fedora Quality Planet

Hello, I’d like to introduce a new sub-planet of Fedora Planet to you, located at http://fedoraplanet.org/quality/ (you don’t need to remember the URL, there’s a sub-planet picker in the top right corner of Fedora Planet pages that allows you to switch between sub-planets).

Fedora Quality Planet will contain news and useful information about QA tools and processes present in Fedora, updates on our quality automation efforts, guides for package maintainers (and other teams) how to interact with our tools and checks or understand the reported failures, announcements about critical issues in Fedora releases, and more.

Our goal is to have a single place for you to visit (or subscribe to) and get a good overview of what’s happening in the Fedora Quality space. Of course all Fedora Quality posts should also show up in the main Fedora Planet feed, so if you’re already subscribed to that, you shouldn’t miss our posts either.

If you want to join our effort and publish some interesting quality-related posts into Fedora Quality Planet, you’re more then welcome! Please see the instructions how to syndicate your blog. If you have any questions or need help, ask in the test mailing list or ping kparal or adamw on #fedora-qa freenode IRC channel. Thanks!

UEFI for QEMU now in Fedora repositories

I haven’t seen any announcement, but I noticed Fedora repositories now contain edk2-ovmf package. That is the package that is necessary to emulate UEFI in QEMU/KVM virtual machines. It seems all licensing issues having been finally resolved and now you can easily run UEFI systems in your virtual machines!

I have updated Using_UEFI_with_QEMU wiki page accordingly.

Enjoy.

‘Package XXX is not signed’ error during upgrade to Fedora 24

Many people hit issues like this when trying to upgrade to Fedora 24:

 Error: Package a52dec-0.7.4-19.fc24.x86_64.rpm is not signed

You can easily see that this is a very widespread issue if you look at comments section under our upgrade guide on fedora magazine. In fact, this issue probably affects everyone who has rpmfusion repository enabled (which is a very popular third-party repository). Usually the a52dec package is mentioned, because it’s early in the alphabet listing, but it can be a different one (depending on what you installed from rpmfusion).

The core issue is that even though their Fedora 24 repository is available, the packages in it are not signed yet – they simply did not have time to do that yet. However, rpmfusion repository metadata from Fedora 23 demand that all packages are signed (which is a good thing, package signing is crucial to prevent all kinds of nasty security attacks). The outcome is that DNF rejects the transaction for being unsecure.

According to rpmfusion maintainers, they are working on signing their repositories and it should be done hopefully soon. So if you’re not in a hurry with your upgrade, just wait a while and the problem will disappear soon (hopefully).

But, if you insist that you want to upgrade now, what are your options?

Some people suggest you can add --nogpgcheck option to the command line. Please don’t do that! That completely bypasses any security checks, even for proper Fedora packages! It will get you vulnerable to security attacks.

A much better option is to temporarily remove rpmfusion repositories:

$ sudo dnf remove 'rpmfusion-*-release'

and run the upgrade command again. You’ll likely need to add --allowerasing option, because it will probably want to remove some packages that you installed from rpmfusion (like vlc):

$ sudo dnf system-upgrade download --releasever=24 --allowerasing

This is OK, after you upgrade your system, you can enable rpmfusion repositories again, and install the packages that were removed prior to upgrade.

(I recommend to really remove rpmfusion repositories and not just disable them, because they manage their repos in a non-standard way, enabling and disabling their updates and updates-testing repos during the system lifecycle according to their needs, so it’s hard to know which repos to enable after the system upgrade – they are not the same as were enabled before the system upgrade. What they are doing is really rather ugly and it’s much better to perform a clean installation of their repos.)

After the system upgrade finishes, simply visit their website, install the repos again, and install any packages that you’re missing. This way, your upgrade was performed in a safe way. The packages installed from rpmfusion might still be installed unsafely (depending whether they manage to sign the repo by that time or not), but it’s much better than to upgrade your whole system unsafely.

To close this up, I’m sorry that people are hit by these complications, but it’s not something Fedora project can directly influence (except for banning third-party repos during system upgrades completely, or some similar drastic measure). This is in hands of those third-party repos. Hopefully lots of this pain will go away once we start using Flatpak.

AMD Radeon R9 270 experience in Fedora 23

Two years ago I purchased AMD Radeon R9 270 graphics card and wrote about my experience in Fedora 20 and also experience in Fedora 21 (Rawhide at that time). I decided to post an update to this, especially after recent news of AMD and Ubuntu deprecating fglrx (catalyst) proprietary driver.

Overall, I have to say the opensource radeon driver made huge progress in the last two years, and I don’t regret my purchase at all. Quite the opposite, I believe I’ve made the best choice possible by picking AMD. Basically everything I complained about in the past got fixed or improved. The dynamic power management works without a glitch. None of the X11 rendering operations are slow anymore. Support for vendor fan speed profiles has been implemented, so my card it now completely silent. All desktop rendering glitches went away a long time ago. The regular daily desktop usage is completely perfect and issue free, and actually noticeably superior even to current intel driver (which was known for its stability and reliability). The intel driver regressed a lot in the last 6 months or so, when developers started rewriting some core parts, while radeon driver remains completely bug-free in my experience.

The situation is of course more interesting when it comes to gaming. There were large quality and performance leaps in the radeon driver. The driver gained support for OpenGL 4.1 and higher versions of OpenGL are expected to be implemented in the next months. That itself fixed a lot of games which refused to run before. Performance also went up significantly. On Fedora 20/21 I complained that Dota 2 ran with 5-10 FPS on low settings. Now I can play it on ultra settings with 80 FPS. Of course this is an extreme example, but it shows that things really improved a lot. It also helps that Fedora is very active in packaging latest graphics driver stack and we usually run on a very recent version of the driver (compared to e.g. Ubuntu, which is quite conservative in this).

I won’t claim that everything it top-notch, though. There are still a few games that don’t run or don’t run well enough. The performance is also not yet up to the catalyst speed. But for a person like me, who owns many indie titles from various bundles, plays a few selected AAA titles from time to time, and can reboot to Windows in the absolutely worst case, is the current situation actually very good. And it seems to be improving constantly. The radeon driver development team is very responsive and if you write a reasonable request or a bug report, they really try to implement it or fix it (for example they implemented GPU-based display scaling on my request).

If you are interested which titles run on my Radeon R9 270 and how well, I made a profile on opengamebenchmarks.org and benchmarked most of my Steam library. You can have a look at my benchmarked games.

dota2-fps
FPS benchmark for Dota 2 on Radeon R9 270

As you can see, many even very graphics intensive games run quite well. For example Witcher 2 is infamous for how slow the Linux port is (it’s emulated by a proprietary wrapper similar to Wine), yet I can play it between 40-60 FPS depending on graphics detail. I was quite surprised.

If you are into gaming, I encourage you to submit your game benchmarks as well, so that we have an easy way to see how individual graphics and graphics vendors perform in games on Linux. I recently packaged voglperf and glxosd for Fedora, so it should be easy for your to install these benchmarking tools.

After considering all of this, I don’t really mind that AMD is deprecating catalyst. I understand that there are still use cases for catalyst, but most of the times the radeon driver is now a serious (and often better) alternative. If this means that AMD team will free up their hands from maintaining catalyst and will be able to put more people into radeon driver development (or the catalyst replacement which they plan to have on top of the opensource amdgpu kernel driver), it’s a good message for majority of Linux users.

glxosd and voglperf now available for Fedora in COPR

For all our gaming enthusiasts, I packaged glxosd and voglperf for Fedora and you can find them in my COPR repositories: glxosd COPR and voglperf COPR.

These tools allow you to have FRAPS-like features on Linux, i.e. show an overlay in OpenGL games/apps to display current FPS, and also capture the frame times into a file and plot them to a graph later. So you can now use it with any Linux game and fine-tune its graphics settings to match your preferred performance. Or you can see when your CPU or GPU is overheating. Or you can contribute to Open Game Benchmarks. Or something else.

This is an example of the glxosd overlay in action (don’t worry, its output is configurable):

glxosd-chivalry.png
glxosd overlay

And if you want, you can later plot the performance into such pretty graphs using this awesome glxosd analyser web page:

glxosdGraph-fps.png
fps graph
glxosdGraph-frametimes.png
frame times graph

And this is an example of the voglperf overlay (top left corner):

voglperf-xcom.png
voglperf overlay

And a generated graph:

voglperf-frametimes.png
frame times graph

There are other similar tools which you can use, but I know about any that is generic and has all these features. There is of course the Steam FPS overlay, but you can only use it for Steam games, and it can’t log frame information. There’s also GALLIUM_HUD, but that’s only available for Gallium-enabled drivers (radeon, nouveau) and also can’t log frame information. These two new tools should work with any driver and can be used for any game/app.

You can find installation instructions in the linked COPR repos. I do not intend to move these packages to official Fedora repos, but if somebody is willing to get their hands dirty and work on that, great, please contact me and I’ll try to help.

Enjoy!

Flattr this

Fedora videos from DevConf 2016 now available

145px-devconf-cz_logo

Even if you’ve been to DevConf personally, you surely missed a lot of very interesting talks and workshops. All the videos are now available. Here are the Fedora related ones:

https://www.youtube.com/playlist?list=PLU1vS0speL2YytY0-1oxuNWXmfd1BHSd6

And here is the full list:

https://www.youtube.com/playlist?list=PLjT7F8YwQhr-Ox8LZY8VFrZHFkApOduBi

Enjoy!

Git Tip of the Day – viewing diffs graphically with meld

I got tired of viewing diffs in a terminal with red and green text. I wanted to see diffs more comfortably, with syntax highlighting, segment highlighting (not just full lines), easy scrolling, searching, switching between files. I wanted to have something like Phabricator diff, Netbeans diff or PyCharm diff. So I finally spent 20 minutes (why do most annoyances take you 20 minutes to solve, but you delay them for years?) and found out that git now has a cool new command, git difftool. And it supports meld, a great graphical comparison program.

Let’s compare this:

clidiff
git diff in gnome-terminal

With this:

meld1
meld diff overview
meld2
meld file diff

Awesome, right?!! All you need to do is this:

$ git difftool --tool=meld -d <diffspec>

Option -d makes it work in directory mode, which works much better with meld. Of course this is too long to type every time, to let’s remember meld as the default diff tool, and even make an alias for it:

$ git config --global diff.tool meld
$ git config --global alias.dt 'difftool -d'

(Also, don’t forget to enable syntax highlighting in meld preferences, it was disabled for me for some reason.)

And now, voila:

$ git dt master..develop

I’m very happy about the increased readability and productivity.


Flattr this